
The foot may well be the most neglected part of the body, largely because it's so often hidden inside a shoe, or simply left outside the frame of the drawing – out of sight and out of mind. This unfamiliarity is, I suspect, what makes feet confusing to draw when they do come up, because as we'll see below, they have relatively simple forms and very little motion. As with the hand, you should not hesitate to take off your shoes and use your own feet as references, when possible!
Basics of the Foot
Let’s look briefly at the structure of the foot: The tarsals or ankle bones in blue, the metatarsi or instep bones in purple, and the phalanges or toes in pink.
Very little of the foot can move, so we can simplify it as shown on the right:

Although the first joint of the toes is back where "actual base" is indicated, flesh covers the foot up to the "apparent base" line, which is why they appear so short (that and the fact they are curved at all times, as we will see.)
The bones of the foot are arranged to form 3 arches that give it the strength to support our bodies. The first two arches shape the bottom of the foot and the third shapes the upper part. Squeeze the sides of your foot and note how rigid they are:the bottom of the foot is not soft and does not deform under pressure. This means that in any position, the indentations of the arches will always show in an adult foot.
The Lateral Longitudinal Arch:
This is the barely marked one outside the foot. It shows as a slight indentation from the heel, both below and outside the foot.

This arch means that the outer contour is not a flat line (except in flat feet), and similarly the line from heel to ball is not a smooth curve but marks the arch.
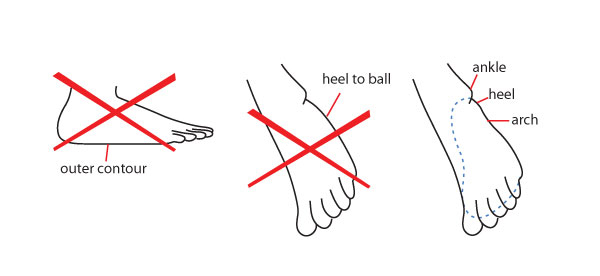
The Medial Longitudinal Arch:
This is the large one inside the foot. It’s a very noticeable indentation. The part of the sole that’s behind the arch (under the red curve in the diagram) would be lost in shadow when the foot is on the ground, so we'd still see the arch, but since we usually see feet from above and not from the ground level, we see it really emphasized:

The Transverse Arch:
This arch shapes the top of the foot.

The toes:
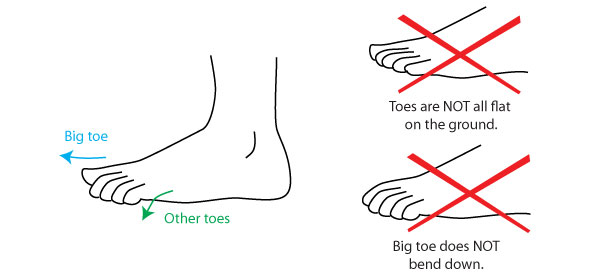
Note the direction of the toes: while the big toe is parallel to the ground and points straight ahead, the other four bend towards the ground, and point down.
Drawing the foot
A simple way to draw feet is to begin by drawing the sole of the foot. No toes, no arches, just the basic shape. It’s shaped like a long egg, flattened on one side (below left).
The advantage of this is that this flat shape is simple enough to be drawn in perspective and under different angles. This part of the foot doesn't bend in any appreciable amount, so this flat shape doesn't need to bend either, saving us a level a complexity. Anatomical accuracy is not a requirement at this point, we’re giving ourselves a guideline to build on.

If you have trouble with the perspective, draw the basic shape, on a sheet of paper and place that paper under the angle you need. It's also a useful observation exercise, to become familiar with how this shape changes under various angles.
The next step is to make a small adjustment to the shape, cutting off a corner to get closer to the foot’s natural shape. If you’re comfortable doing so, you can start directly with this step:

Now to give it dimension. As you can see, it’s a flattened, curved pyramid, with the apex closest to the heel: the circle is the section of where the leg joins with the foot and forms the ankle. The dashed lines are to help you see the contour. only the black outline is needed for the drawing.

Finally, add the toes. Adding the toes separately means you can draw their movement independently from the basic shape, which as mentioned above bends almost not at all. If needed, sketch a guideline to define the general shape of the toes (see shapes further down) before drawing them individually. They are pressed together so, from almost all angles, they overlap. Note the position of the little toe: its base is positioned between 1/4 and 1/3 of the total foot length (here the lines divide the foot in 4, so it's 1/4th).

Finalize by carving out the arches and adding the ankle bone and Achilles’ tendon.
As an alternative to the above method, you can also draw the foot as a wedge, and then add the toes and carve out the final form:
Additional Details
Here are more advanced details, small things that make the foot look right. You'll notice that some are the same as in the hand.
Toes:
- The toes look longer on top of the foot than they do underneath it.
- The toenails start halfway up the top joint. As toe joints are so short, toenails are wider than they are long.
- Note also how much larger the big toe is, twice the size of the second toe, so that its first joint is within the foot and can barely move.

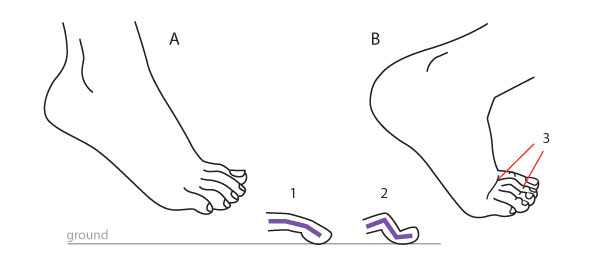
How the toes look when the foot is bent depends on how much weight is on them:
Foot A below is relaxed. Even though the toes bend a little, there is no real weight on them. In this situation they preserve their gentle curve to the floor (1).
In foot B, most of the weight is on the toes (note that this is only possible when pressing against a surface, this can't happen in a foot in mid-air). The pressure makes the second joint stick out, as shown in (2). Bend lines appear in the other joints (3) and the big toe goes even straighter and it is completely flattened against the ground.
When not pressed against a surface, the range of mobility of the toes is limited to the 2 extremes of curled vs. splayed (with, literally, wiggling room in-between.)
- The first joint can completely hide under the foot...
- ... except for the big toe, which is stuck at around 90º.
- Hyperextending (splaying) the toes makes them point in different directions.
- Tendons appear, as well as space between the toes.
- Note that the 4 smaller toes remain curved down, they can never curve up.

Profile Views:
- There’s always a bump here that’s more or less pronounced.
- The ankle is higher on the inside.
- At least 2 toes show behind the big toe, depending on angle of view.
- Only a ground-level angle of view hides the small toes completely.
- The outer line of the foot travels up as the foot turns out.
- The inner line of the foot shows a proper arch, and then reverses into another, smaller arch (the padding line) near the toe.
- Again, the inner line travels up as the foot turns in. Note that the line of the arch disappears very quickly because there's no real angle there, while the padding line remains visible.
- At some point the joint of the gig toe starts protruding, creating a bump on the upper side of the foot.
- These tendon lines may or may not show. Tension makes them pop out, and they can be permanently visible in male or elderly feet, but they will look out of place on female or young feet. You have to judge for yourself whether they serve your purpose or not.

Front View:
A shows the foot seen frontally when it’s perfectly level, such as from ground level.
From this angle the toes look like peas in a pod, and you can simply draw them as balls before connecting them to the foot. Usually however, our frontal view of feet (when they are on the ground) is from a higher point of view, as in B.
- What looks like a “6th toe” is the padding outside the foot.
- The big toe looks oval rather than round.
- The big toe and second toe are usually separated by a space.
- In a frontal view that reveals the underside, the ball of each toe shows clearly.
- The padding line is horizontal from this angle, NOT parallel to the sides of the foot.
- When the toes are lifted, the padding of the forefoot is visible underneath them.
- The inner line of the padding may appear, cutting the foot in two by running towards the ankle.

Where the Foot Joins the Leg:
- Roughly speaking, the front side of the leg falls vertically into the foot.
- The back of the leg slopes in, but the heel protrudes out again.
- This is a transition plane between leg and foot – there is no sharp angle. Look for it in all the diagrams above.
- Note that the inward slope of the back and outer sides of the leg is connected to the calf muscle. The less muscular the calf, the straighter this line; in extreme cases of muscle depletion it becomes quite vertical because it then follows the bone. Inversely, excess fat will cause both lines to bulge in a sausage effect.
- Seen from the front, the inner side of the leg is vertical while the outer side slopes in.
- The ankle bones jut out both inside and outside, but higher on the inside.
- On the outside, the ankle bone appears tucked behind this line.
- The Achilles tendon runs up from the heel into the leg, creating an open drop shape.
- The thinnest part of the leg, both from the side and from the front, is a little above the ankle bone.

Considering the line of the tibia, which is the straight line running down from the knee, a relaxed foot (A) forms an angle with this line, while a fully extended foot (B) causes this line to run down all the way to the toes. Some people can point the foot until it bends even further than the line (C), but this isn’t common. Note the skin folds above the heel!

Diversity
No less than hands, feet are quite individual and have their own small range of shapes. Unlike hands, they can be permanently affected by non-genetic factors, namely the wearing of shoes. Note that in a given person, hands and feet work rather like a set. If someone has big hands, they'll have big feet as well; thick fingers are reflected in thick toes, and so on.
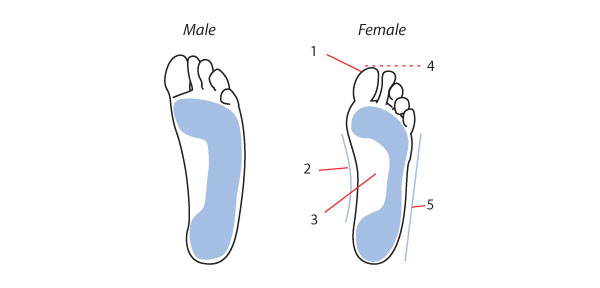
Male and Female Feet
Female feet are not a smaller version of male ones, but have a slightly different structure. In a female foot:
- The big toe is shallower (not so prominent)
- This inside line is more curved.
- The arch is higher.
- The foot is smaller for a given body height.
- This outside length is shorter.
Arch Types
These show most in the foot’s imprint. A normal foot shows, in print, a pronounced inner arch and slight outer arch. In flat feet (aka low arch or pronator) there are no arches, all of the foot sole touches the ground. In a high arch foot (aka supinator), only a narrow band connects the heel and the ball of the foot. Flat and high arch feet can cause aches in the muscles and back (note however that infants commonly have flat feet, the arches developing in early childhood).

Foot Shapes
The overall shape of the foot is created by the arrangement of the toes in two ways:
Which toe is longest:
- Egyptian foot: The big toe is longest.
- Greek foot: The second toe is longest.
- Square foot: Toes have even lengths.
Contrast between the widest part of the foot and its "tip"
- Wide foot: Less contrast between the widest part of the foot and its tip.
- Narrow or Tapering foot: More contrast between the widest part of the foot and its tip (due to the last 2 toes receding too much).
